
")
11.1. EasyDMX – Fader Control
11.1. EasyDMX – Fader Control
The use of the EasyDMX-Editor (Fig.123) is similar to the Figure Editor, but for the control of DMX devices “macros” are created (comparable to the figures in the laser shows). Each DMX macro consists of one or more steps (“scenes”) and can be assigned to a key (similar to the figures in the Figure Editor). After having creation, assigned and stored the macro, it can be used.
In Fig.121 there are a lot of vertical scrollbars. Each scrollbar controls one output channel, which can be assigned to one or even more DMX channels (As default each scrollbar is assigned to the respective channel number).
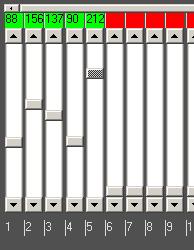
The creation of a DMX-macro works like the creation of a figure. First click on “Create New DMX Macro”. This creates an empty “Macro 0”. Then the scrollbars can be set to the desired positions. To use the scrollbars for channels with higher numbers then 50, use the upper horizontal scrollbar to make them visible. The colored boxes above the scrollbars are all standard colored red after the “Create New DMX Macro” has been clicked. The red color indicates the controls that have not yet been used for the macro in active edit mode.
All red marked channels do not change the value of the respective DMX channel when calling the macro. If a scrollbar is set to a value, the red box color changes to green and the specified DMX value is put out. The visualization of active and non-active channels through color code is made to avoid any unwanted behaviour of the macros later. Hit “Save” to save the very macro.