
")
11.6. “Intelligent”-DMX
11.6. “Intelligent”-DMX
A click on the button “Use intelligent DMX devices” changes the interface of the DMX-window (Fig.130)
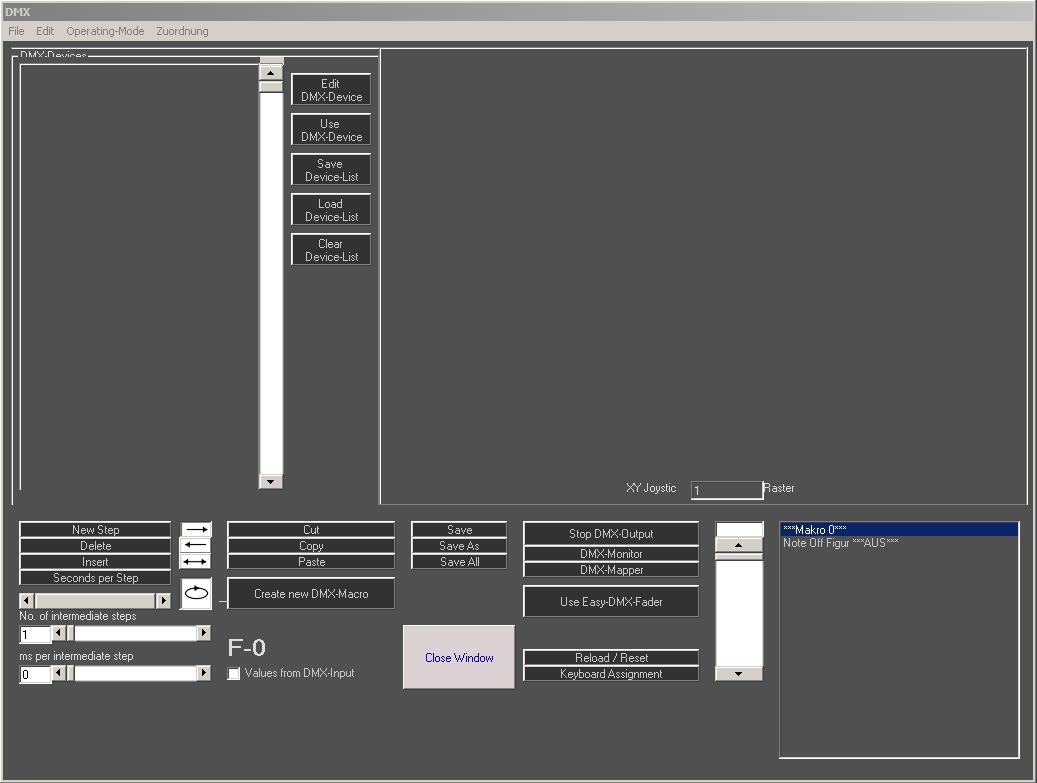
Fig.130: DMX / Intelligent DMX Window
Before being able to use any intelligent devices, a profile for each intelligent fixture needs to be created.
11.6.1. Button: Edit DMX-Device
 Select or edit an intelligent DMX device with this button. A new dialog opens that allows for specifying the configuration for the devices, see Fig.130.
The example in Fig.131 shows a very basic and simple profile of an RGB moving head. The start address is set to DMX Channel 1
11.6.2. Label
The label allows for giving names to the very channels. This makes it easier to identify them later.
11.6.3. Dimmable
This column can be set to true or false per channel. It specifies if the very channel shall be considered a dimmer channel, meaning that this very channel can be dimmed using intermediate macro steps. If set to “false”, the channels values always immediately change to their nominal values. This e.g. significantly influences on the behavior of Gobo-Wheels in Moving-Heads, Light Scanners and similar devices.
11.6.4. Master sensitive
If this option is selected for a certain channel, this channel reacts to settings of the master dimmer. Usually only the brightness channel(s) is/are assigned a “true” value(s) here. Example: If all channels of a moving head fixture would be assigned “true” for the Master Dimmer, the head would also move to the zero position if the master fader is put to zero – so would all colors and gobos do.
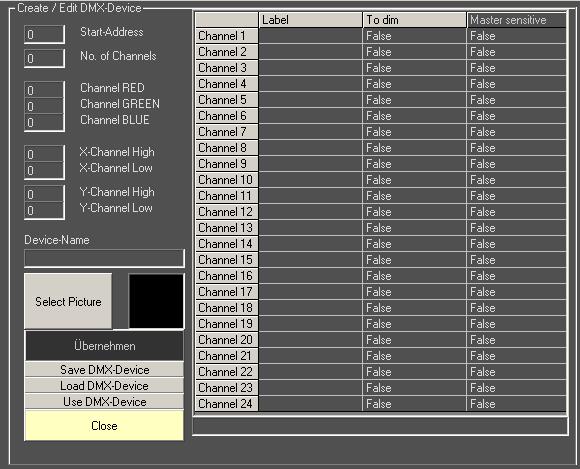
Fig.131: DMX / Intelligent DMX /Edit DMX-Device
11.6.5. Channel Red/Green/Blue
If channel numbers are entered per color, an RGB color selection field becomes available (Fig. 130). If a non-RGB device is used, enter “0”.
11.6.6. X and Y Channels (PAN/TILT)
If values are specified for the X and Y Channel, a joystick for head movement control is available for programming later. The “Low” values refer to the 8-bit resolution channel; the “High” values refer to the 16-bit resolution channels. For non-moving devices enter “0”.
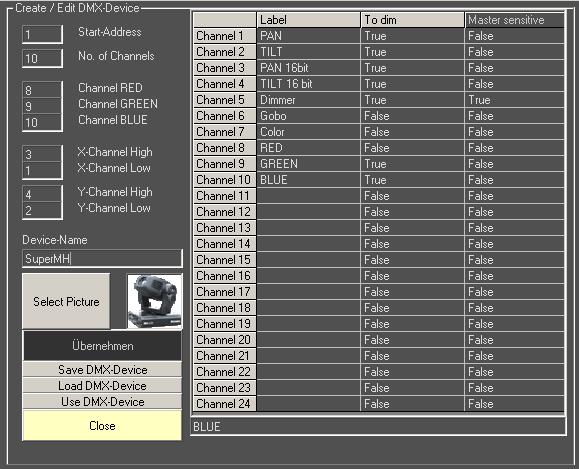
Fig.132: DMX / Intelligent DMX /Edit DMX-Device. Example
11.6.7. Use of several identical DMX-devices with different addresses
To use several identical DMX units it is necessary to create the profile for one device first. For the other, identical devices it is only necessary to copy the existing profile and simply change the DMX start address (and probably the name as well). Then save the profiles for the devices, using different filenames.
It is not always necessary to individually save the newly created profiles: If the button “Use DMX Device” is clicked after the profile has been created, the profile is inserted to the device list (without saving). The device list itself can be stored afterwards. It does not require the single profile files.
11.6.8. Button: Save DMX-Device
Save the profile of one DMX device (the one in active edit mode).
11.6.9. Button: Load DMX-Device
Load a *.ger file either edit it and just include it to the device list.
11.6.10. Button: Use DMX-Device
On click on this button, the device profile is immediately inserted to the device list, without saving the individual profile. As it is possible to save a complete device list, this procedure makes the creation of profiles quicker and easier.
 Load stored device profiles to the program with this button. A list of devices can be created this way (see example in Fig.132).
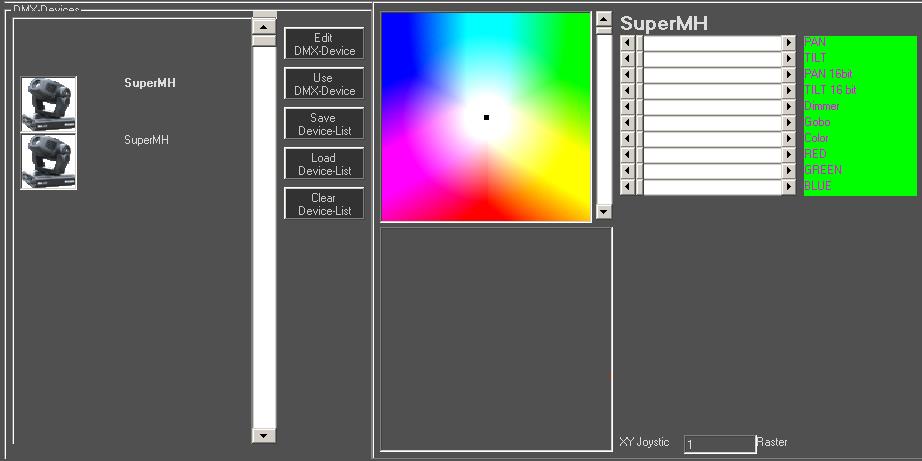
Fig.133: DMX, Intelligent DMX, DMX device list, color-select area and XY-joystick area
11.6.11. Selection of the DMX devices for creating macros
Select a device from the list by clicking on it, is is the marked as “active” (the device name is displayed in bold letters). The functions of the very device are shown in the right part of the window.
11.6.12. Selection of multiple DMX Devices for creating macros
It is possible to select several devices at the same time for macro editing.
Select the first device and hold the Ctrl-Key while selecting the other ones. The functions of the selected devices are shown on the right side of the window. If RGB values are specified, the color select field is displayed, and if PAN/TILT values are given, a grid area for positioning the fixture is displayed just below the color select field. The grid for the x-y control works slightly different to the one of the Figure Editor. Try different values to see what fits the requirements best. An example: Using a value of 4 divides the area to 4 equal parts. This can be advantageous when using moving-head fixtures, especially if they can rotate their head more than 360°.
If several devices are selected for editing at the same time, the actual values may not be displayed correctly: It’s always the values of the device that has been selected as last one that are displayed.
Important: Only select several devices of the same kind at once – using different device types in one grouped selection can lead to unwanted results and effects.
But: It is possible to select several head-moving floodlight fixtures and then change their X and Y position, even if their channel assignment for Pan and Tilt (X and Y) is different.
11.6.13. Button: Save Device List
If a device list is completely configured it can be saved with using this button. If not saved, the device list is lost on program restart.
The device name is preset by the Laserworld Showeditor. It is only possible to store one device list. The device list must not necessarily be loaded for playing shows containing DMX macros.
11.6.14. Button: Load Device List
A click on this button opens a prior stored device list.
11.6.15. Button: Clear Device List
A click on this button clears the contents of the actually loaded device list.
11.6.16. Use of Intelligent DMX-Devices
After the profiles of the desired “intelligent” DMX devices have successfully been created, they can be used for creating macros. Use the macro creation buttons, as described in Chapter 11.3.2 and following, for creating macros with intelligent fixtures.
11.6.17. Intelligent DMX and License
Intelligent DMX is only available in fully licensed Laserworld Showeditor software versions.
11.6.18. Menu of the DMX-Window
The menu of the DMX window only holds items that are directly accessible through buttons as well. Please see the description for the very button for details.