
")
6.4.Frame Tools
6.4.Frame Tools
A figure consists of one or several frames. Like a video sequence, the consecutive frames show an animation.
These Multi-frame figures are quite common and Laserworld Showeditor provides many features for animations and frame settings.
Different terms may be used to specify these “multiframe” figures: Sometimes they are called “multiframe”, sometimes “Animations” or just “Frames”. All terms mean the same.
When a single or multiframe figure is played, there is a special time sub-track that has control over the actual speed the animation is played. The speed is given in “Frames per Second” and is manually assigned per figure. The more frames are played per second, the smoother is the animation later (assuming that the frames are different – see chapter 6.4.4 and 6.4.5 to understand the morph feature).
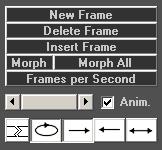
On creation of a “New figure” (see chapter 6.2.1) only one frame is created, it has the number 0. Additional frames can be added with using the Frame Tools (Fig.42):
6.4.1. New Frame:
Left mouse click: Adds a new, empty frame at the end of the actual frame series. The scrollbar below the Frame Tools buttons automatically jumps to the last frame (which is the new one).
Right mouse click: Adds a new, empty frame at the end of the actual frame-series. In addition to this, all points of the active frame are copied to the new frame. This is very helpful if only slight modifications shall be made for the animation or the whole frame shall be transformed.
6.4.2. Delete Frame:
A click on “Delete Frame” deletes the active frame. The next frame will be displayed after the active one was deleted. If several frames shall be deleted, it may be easier to use menu item Frame Tools -> Cut Frames A=>B to Clipboard
6.4.3. Insert Frame:
This button adds a new frame at the actual frame position. It will be inserted just in front of the active frame. All following frames shift by one frame. When clicking with the right mouse button, the content of the active frame is copied to the new one on insertion.
6.4.4. Morph:
Morph effects create a smooth transition between single frames in a figure. However, the transition effects are limited, so color transitions work best with the original colors from the palette.
The morph tool “calculates” the values of ne frames in between of two existing frames, make the frames look like smoothly transiting von frame one to frame two. By doing so, more frames are embedded in between frame A and B creating a smooth animation.
Technically spoken, this is what Laserworld Showeditor does when morphing frames: The two frames – beginning frame and end frame - are calculated with the same number of points, adapting each frame to the one with the most points. The points of the frame are the shifted gradually from their start position in frame A to their end point in Frame B. The color values are morphed respectively. So what happens is that every single point changes its position and thus creates the desired effect.
Several important aspects need to be considered when using the Morph tool: As only points are moved from A to B, it may happen that the points are moved to a different position as expected – because if frame A and frame B are very different, the software cannot determine which point in A should end up in which point in B.
When morphing Polygons, make sure to have entered “0” in the Overlapping Edges dialog (see the explanation of the Polygon tool in chapter 6.2.9), so no overlapping edges are set.
“Morph” calculates the specified number of frames that are inserted between two frames (A and B). So before this tool can be used, at least two frames must exist. When clicking on the “Morph” button, a dialog shows up, asking for the number of the start frame, the end frame and the number of morphed frames:

Fig.43: Enter number of start frame. If only two frames are in the figure, this would be “0”
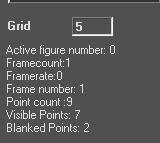
Fig.44: The number of the active frame can be found in the info box in the left lower corner
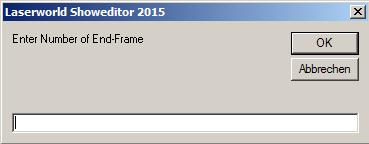
Fig.45: The number of the end frame must be entered. If only two frames are in the figure, this would be “1”
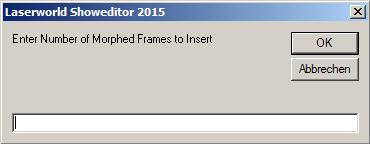
Fig.46: The number of morphed frames that should be inserted must be specified. The more frames are inserted, the smoother the transition. The required number of frames also depends on the speed the morphed figure shall be played later. A value of “10” is good to lean how the tool works, but even 50 or more frames are possible – depending on what is required.
6.4.5. Morph All:
The “Morph All” figure works similar to the Morph tool, but applies the morph procedure to all frames in the active figure. This tool only opens one dialog that asks for the number of frames that should be inserted. Then the morphing will be calculated between frame 0 (the first one) and the last frame of the figure.
This tool is often used to create smooth transitions between frames of an animated cartoon, so e.g. if a walking person has been drawn on 5 frames, each one showing a part of the movement, then the “Morph All” tool makes the person walk smoothly.
Important:
The assignment of the points is essential, as like with the morph tool, the transition is made point-wise – which means that point 1 in the start frame will morph to point 1 in the end frame. If these are at very
different positions, this may lead to unwanted effects.
To avoid these effects, it makes sense to use frame copies of the first frame in the following ones, so the order of the points remains the same even if adaptions are made.
Important Information: If “Morph” is used between e.g. frame number 10 and frame number 15 of a frame series (e.g. 20 frames are present), then the frames 11, 12, 13, 14 are overwritten!
6.4.6. Frames per Second:
“Frames per Second” defines how many frames of a figure shall be displayed per second. This is the actual speed the figure is played in. Depending on the number of frames the figure consists of, the speed needs to be adjusted: If too few frames are played too slowly, the output has a stuttering look, as each frame stays visible for too long. Setting the correct frame rate is important, especially for graphics and text animated figures.
A click on “Frames per Second” opens a dialog where the number of frames per second can be entered. A frame series consisting of 50 single frames will last exactly 1 second, if the speed is 50 fps ( = frames per second).
This value
has absolutely nothing to do with the scan speed and the picture repetition rate of the laser projector.
The value simply specifies how fast the frames of a figure shall be played (exactly like the frame rate of a video). If the frame rate is higher
than the repetition rate of the laser projector, then some of the frames are simply dropped – which will not influence the display. If the frame rate is lower than the picture repetition rate of the laser projector, then frames are displayed multiple
times, so no gaps happen.
- The speed can be entered in three different ways:
- Frame rate without any unit specified:
If only a number is entered, without specifying a unit, the software takes the input as standard “frames per second (fps)”. For example, if “20” is entered, 20 fps will be displayed. - Frame rate with unit “ms” -> duration:
If a number and the unit “ms” is entered, then every frame will be displayed for the entered duration of milliseconds. For example, if “20ms” is entered, every frame is displayed for 20 milliseconds (resulting in this being a frame-rate of 50 fps then). - Frame-rate with unit “bpm”:
If a number and the unit “bpm” is entered, then all frames are displayed xx times per minute. - For example, if “20bpm” is entered, the software adapts the frame-rate in that way that the series of frames (the figure) is displayed 20 times per minute. The “bpm” unit has been implemented especially for the
requirements of laser shows that are synchronized to music.
The BPM rate of a song can be terminated using Tools -> Beat Counter in the Timeline window.
Information:
PPS and FPS
If a figure consists of multiple frames, the speed of the output of these frames is specified by “Frames per Second”.
Assuming that every frame shows a picture consisting
of 500 points and the DAC outputting at 5000pps, then 10 frames per second can be displayed by the projector. If a frame-rate of 20fps is selected, then every second frame is dropped. In contrast, if 5fps are selected, every frame will be displayed twice.
This way the output speed of the figure is independent of the DAC as well as of the laser system in use. The animation speed of the displayed figure remains the same.
If a short stutter is recognized on output, a slight adjustment of the
fps rate can fix
6.4.7. Scroll-Bar (Frame Selection):
The scroll-bar below the button “Frames per Second” is used for changing between the single frames of a figure. The respective frame-number is displayed in the info box of the Figure Editor in the lower left corner (See Fig.44).
6.4.8. Buttons for editing the frame display order:
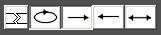
The buttons below the frame selection scrollbar specify the running order and behaviour of the frames playing. With the three buttons “right”,
 “left” and
 “back and forth”
the direction of display of the frames can be specified.
The  “Loop” button sets the repetition of the frames to loop.
If the direction of display is set to “back and forth”, the frames may run asynchronously after a while if the frame rate is defined in combination with the unit “bpm” (See chapter 6.4.6), as the first and the last frame are doubling on output with this method.
The button on the left  activates a cutting tool, which can be used for splitting up longer animated figures. The active frame is used as cutting point, and this frame becomes
the first frame of the second figure and the last one of the first figure.
activates a cutting tool, which can be used for splitting up longer animated figures. The active frame is used as cutting point, and this frame becomes
the first frame of the second figure and the last one of the first figure.