
")
7. Effects & Animation
7. Effects & Animation
The Effects Window provides mighty features for animating and modifying the active figure. The Effects Window opens with a click on the button “Effects” in the right column of the Figure Editor.
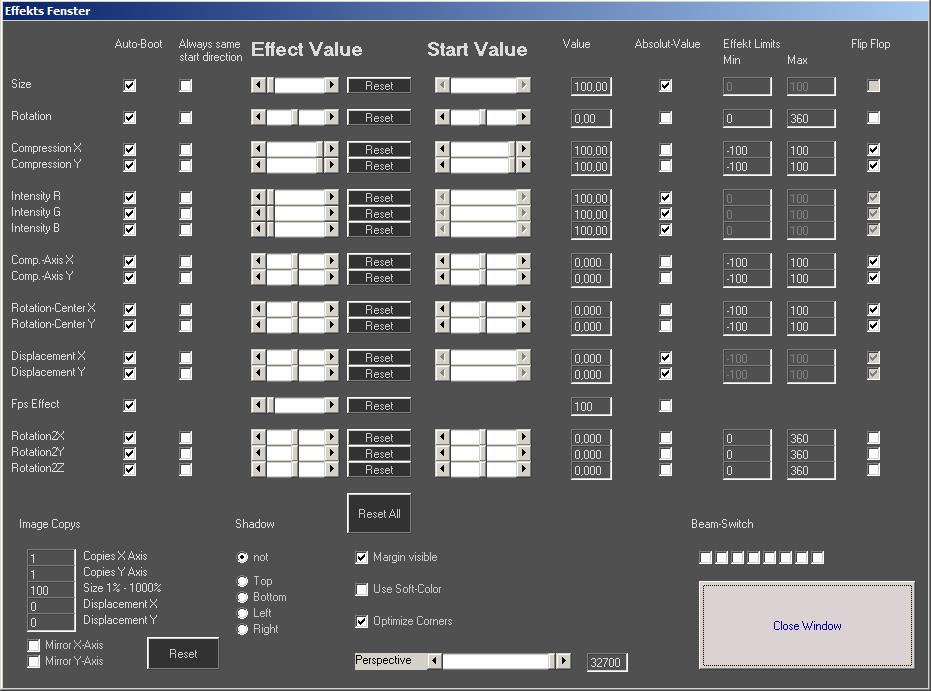
Fig.86: Figure Editor: Effects Dialog
Any settings made in the Effects Window are stored together with the figure, so they are preserved.
Effects can be applied to a figure the following way:
- Create the figure.
- Change the desired settings in the Effects Window
- Save the figure.
- On calling the figure afterwards: Depending on the settings, the effects are applied to the figure as “Start Values” or not.
Start Value means, that this is the initial position the laser starts on first call. If the behaviour of the figure is modified during the calling of the figure, it should restart with those modified settings on second call. This behaviour can be manipulated with selecting the “Auto Boot” checkbox (see below for details)
Description of the Effects Window:
Any Effect Value can be specified from –100% to +100%, if the effect is bidirectional (can have positive and negative values). Rotation effects use a wider spread of values from –180° to +180° or from 0 to 360° (or even more).
The Reset-Button next to a specific value resets it to standard.
The Reset-All-Button resets all values with individual reset buttons to standard.
Auto Boot:
Selecting this option specifies that on recalling a figure, the previously selected effects state, specified as Effect Value, shall not be preserved but the Start Value shall be called instead.
This means that if e.g. the rotation speed has been changed for a figure during a show, it is not preserved when the figure is called again – the figure restarts with the presets set as Start Value.
Always same start direction:
This is only available if Auto Boot is activated and toggles with the Auto Boot settings too. Selecting this option means that the direction of the effect is also bound to the Start Value on recalling the figure.
Absolute Value:
If checked, Absolute Value defines the chosen values are considered as being absolute, e.g. a certain angle, and the animation stops as soon as this position is reached.
If unchecked, the values are considered to being relative to the prior value, e.g. a percentage of a circle (for rotation effects), and the effect continues to being applied and thus does the animation.
Example: Effect Rotation, the Effect Value is set to 10. If Absolute Value is activated, then the figure is rotated by +10 degrees. In that position it stops and stands still. The figure can be rotated further with the Timeline Editor or the Live Window, but only by defined angles. If Absolut Value is not activated, the Effect Value describes a certain speed of rotation.
“Effects Limits” specify the limits for the respective effect. Setting limits only makes sense, if the option Absolute Value is not activated.
“FlipFlop” allows for the effect to alternate. E.g.: The effect Displacement Y standard only goes upwards. With selecting “Flip Flop” it alternates vertically.
“Margin visible” keeps the figure visible within the projection area, even if the applied effects would move it out. Margin Visible compresses the points that would normally not be visible and displays them at the side where they would have left the projection area.
“Use Soft Color” activates smooth color transitions between points. The settings made in Options->Optimize Output->Soft Color Distance are used for the fade effects. The Color Gradient is calculated and displayed in real time during the output.
Activated “Optimize Corners” adds additional points at corners to improve the display of corners. The settings made in Options/Optimize Output/Corner Point Repetitions (see 6.25.5.3) apply. Hint: In case the figure is a wave, it is recommended to uncheck this option.
“Perspektive” scrollbar allows for changing the viewing perspective on the figure.
Multiplication Effect:
To create a multiplication effect to a figure or mirrored figures, “Image Copies” can be specified: The value for “Copies X-Axis” and the one for “Copies Y-Axis” describe the number of copies of the figure that are displayed. On applying values greater than 1, no copies are visible at first, as they overlap the initial figure. The copies become visible at the time a displacement or a mirroring is applied.
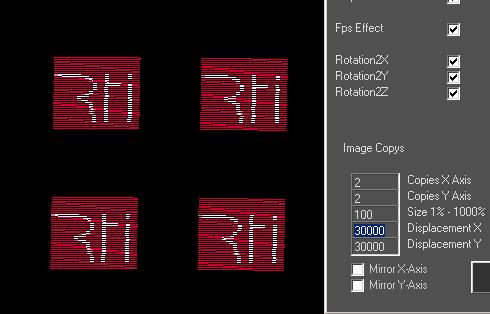
Fig.87: Effect Window: Multiplication Effect
The Multiplication effect can be compared to the prism effects known from conventional lighting systems.
At “Size 1%-1000%” it is possible to specify the size of the copies. With “Displacement X (Y)” the displacement of the copies can be adjusted in X and/or Y-direction. With “Mirror X(Y) Axis” the figure can be mirrored on the X and/or Y-axis.
The button “Reset” is used to reset all Multiplication Effect settings.
“Shadow” suppresses the output of a part of the figure depending on the selected option. The shadowing refers to the geometrical center of the drawing area. A shift of the scan area in Options->Output has no influence on this effect.
Important:
On creation of a new figure, the Effects settings of the previous figure are applied as pre-configuration. On saving the program settings via Options, the active effect settings are saved as default settings, as well.