
")
6.11. Buttons in the right column
6.11. Buttons in the right column
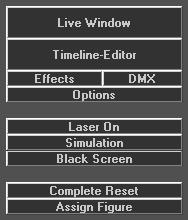
The buttons in the right column of Laserworld Showeditor (Fig.56) either open a certain sub-program window or allow to directly accessing major control features.
6.11.1. Live Window
A click on this button opens the live laser show control window. To use the Live Window features it is necessary to assign the figures that should be used, to keys.
The Live window offers a powerful user interface for creating spectacular live laser shows. Please see chapter 12 for details on the use of the Live window.
6.11.2. Timeline:
This button opens the Timeline Editor window – a great feature for creating timeline based, music (or generally media) synchronous laser shows. Please see chapter 7 for details on the Timeline Editor
6.11.3. Effects:
This button opens the Effects Dialog. Please look at chapter “Effects Dialog” (Chapter 6.2.5) for more information. The settings of the Effect Window always refer to the active figure!
6.11.4. DMX:
The DMX-Window allows for DMX control of DMX fixtures or other DMX controllable units. Please refer to chapter 10 “DMX-Editor” for more information.
6.11.5. Options:
The Options window is used for the basic configuration of Laserworld Showeditor. Hardware setting, usability features and performance settings etc. can be made here. Please refer to chapter 6.2.6 “Options” for further information.
6.11.6. Laser ON:
“Laser ON” switches on the laser output (if the hardware is properly configured and able to output). By deactivating “Laser ON”, the laser output is stopped immediately.
In the case the Simulation Window is opened, maybe also minimized, then this window will come to front and the output is directed to it – so no real output to the hardware happens. Close the simulation window for proper real laser output.
If nor hardware interface (DAC) is connected or mapped properly (only Virtual Devices in use), the simulation window will open on click on “Laser ON”.
6.11.7. Simulation:
This button opens the Simulation Window. The chapter “Simulation” provides further detail on this feature. As long as the simulation is in use, no output to the laser projector is possible.
6.11.8. Black Screen:
This button switches the computer monitor to black screen mode.
This can increase the output speed of the laser output, because the calculations, which are necessary for the display on the screen (updating the effects, figures, etc.), are obsolete then. And: The light of the screen does not disturb the laser show display, too.
In Options -> Others it is possible to specify the blackout type: Only a black screen or monitor to standby mode.
In some cases it’s advantageous to set the monitors to standby mode, as this affects not only the main monitor, but all screens in use. A disadvantage of the Standby blackout is that PlayHQ playback may be slightly delayed in start.
The Standby black out ends if any key is pressed or the mouse is moved.
If a show is started via PlayHQ, via Count-Down-Timer or via the “Start xx Seconds”-feature, the button “Black Screen” will be activated automatically.
A speedometer can be activated for the normal black screen mode (Options -> Others) to show some basic information about the frame actualization during black out mode.
Hints for working with blackout mode:
Deactivate standby: Move mouse or push a key.
Deactivate black screen: Click with right mouse button.
Deactivate black screen and stop the show: Click with left mouse button or push the ESC key.
6.11.9. Complete Reset:
“Complete Reset” updates all figures by reloading them to the Figure Table. This resets all unsaved changes that have been done to any figures.
6.11.10. Assign Figure:
Key assignment can be done by using this button. The assignment of figures to keys on the keyboard is essential for further work in the Live Window and the Timeline Window. There are several other ways to assign figures to keys. Those will be explained in the following chapters.