
")
9.2. Menu: File
9.2. Menu: File
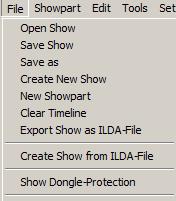
9.2.1. Open Show
This menu item is used for opening an existing show. Select the appropriate show and click Open. Additional possibilities to load shows either is the use of the playlist or a double click on the show file (extension *.shw) in the Windows Explorer.
9.2.2. Save Show
This menu item is used for saving the active show.
9.2.3. Save as
This menu item is used for saving the active show with a new name. It is possible to use the same show folder for different shows, if they all only use figures that reside in this very folder. It is possible that these different shows in one folder use different music files too.
9.2.4. Create New Show
Clicking on this menu item opens the dialog for creating a new timeline laser show: The sound file for the new show must be selected first. It is recommended to create a new show folder that should hold the music file, prior to this step. File types *.mp3 and *.wav are supported.). All show files and figures must be stored in the same folder to be accessible for show programming.
After having selected the music file and specified the name for the show, the Figure Editor automatically opens the show folder and loads all available figures and frames to the Figure Table.
The creation of the show can begin.
If the show shall be programmed with using a *.wav-file, but the show shall run with an *.mp3-file later (due to file size), put both files into the show folder (they must have the same name, just a different file extension). After having finished the programming, delete the *.wav-file. On reload of the show a message pops up, stating that the music file is missing. Go to Options -> Tab Show and select the *.mp3-file.
9.2.5. New Showpart
It is possible to create showparts that are all saved to the same show folder. Each showpart is treated as “figure” and also appears in the Figure Table. They can be assigned to a key, like a normal figure, and be used within a live show or in a timeline laser show.
There are some limitations:
- A showpart shall not contain calls of other showparts (no cascading of showparts).
- If several showparts are running at the same time, the last called event has priority.
- It can happen that one showpart stops the playing of another one under certain circumstances.
- Showparts are no real figures or animations, but they are small shows that call figures and apply effects to those.
- It is suggested to arrange each showpart in a way that after the sequence has been run the called figures are terminated.
- Showparts can be used in the Live Window, too. That way it is possible to call figures and effects for several tracks with only one key.
The creation of a showpart works similar to the creation of a complete laser show (Timeline Show). The showpart, however, is meant for not being a whole show but e.g. the refrain of the song, that shall be repeated one or several times later on.
To create a showpart, click on New Showpart, select the music file (mandatory, even if the showpart is played without music later e.g. in the Live Window) and record the events for the showpart like for a normal laser show. All effects and figure tracks can be used.
When having finished the creation of the showpart, click on Menu -> Showpart -> Create Showpart from Sequence. By doing so, the created showpart is saved to the Figure Table as figure. The Timeline Editor then returns to the actual show. The showpart is then available in the Figure Table as a new “figure” with yellow design.
To edit the icon, right-mouse-click on it, select “Edit Showpart Icon” and specify the thumbnail.
The showpart itself can also be edited with a right mouse click on the icon. The program opens the Timeline Editor and automatically loads the showpart for editing.
After editing the showpart, the changes have to be applied through Menu -> Showpart -> Apply. Store the showpart “figure” with a click on “Store” in the Figure Editor. The active show is buffered in the computer’s RAM. Therefore so not switch off the computer, or the edited data can get lost.
9.2.6. Clear Timeline
Clicking this menu item completely empties the active show timeline by deleting all events.
9.2.7. Export Show as ILDA-File
It is possible to export complete timeline shows as ILDA files (if the appropriate rights are granted). This menu item allows for export of Laserworld Showeditor laser show files to the standard ILDA format. Shows in ILDA format can be shared between different laser show control systems, as most software in the market is capable of importing ILDA files – however many of them don’t support ILDA export. Laserworld Showeditor explicitly allows ILDA exports.
It is important to mind these points:
- The show is exported including optimizations, color correction and geometrical corrections. For exporting a show as ILDA-file, all options should be reset to standard or set to maximum values (e.g. output-size).
- If the show is programmed for more than one output channel, one ILDA file is generated per channel (a number is added to the ILDA-file name to identify the output channels).
- The ILDA file contains 2-dimensional coordinates.
- The ILDA file can contain a color table.
- The ILDA file should be created as RGB-file. The software does not create ILDA files with Pangolin colors!
- If the ILDA file is exported without colour-table and without RGB-data, the colors may not be displayed correctly on the target system.
After the click on the menu item just follow the instructions.
It is recommended to set the frame rate to 25-50 frames per second, even if the Galvo systems that are to be used for output are not able to handle this.
It is also suggested to not use any color correction when exporting to ILDA files, as well as not to use any color shift settings for optimization. A good value for scan rate settings for ILDA export is 30 kpps.
9.2.8. Create Show from ILDA-File
This menu item is used for importing ILDA files to the Timeline. On import, the frames-per-second value is calculated from the number of frames of the ILDA file and the length of the song. The ILDA file is imported like the ILDA figure import in the Figure Editor. Further the initial framerate per figure must be set (reasonable proposal is given), the key assignment is done and the *.heb-file for the figure (of the ILDA file) is saved. A show file is created with only one event on track 0. The show name, as well as various options and settings are asked in dialog boxes.
The whole import requires the ILDA file running at a constant frame rate (fps). It is strongly recommended to only use ILDA files that are created using the standard RGB configuration. If this is not the case it can help to load the Pangolin Color Palette (See Chapter 6.19.4). After the import successfully finished, the original IDLA file is not needed any more, as it has completely been converted to the *.heb format.
In case the import does not work properly, please refer to the Showeditor Support Forum.
If the ILDA show is a multi-projector show, then the additional files (for the other projectors) must be imported manually. They are stored as figure files within the show folder and assigned to keys, so they can be used in the Timeline.
9.2.9. Show Dongle-Protection
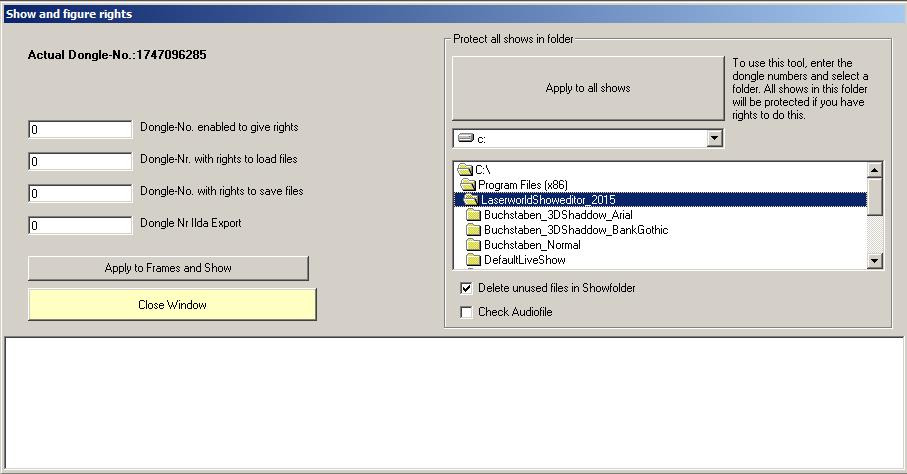
Fig.109: Timeline Editor: Show Dongle Protection
Laserworld Showeditor allows for protecting shows by only allowing it to be played and/or changed with the use of a certain Showeditor license. This is an important feature as it is possible to sell created shows to customers and it is not possible to share the shows online with other users, as the show is bound to the very Showeditor license.
There are two ways for protecting shows:
a) Only one single show or
b) All shows within a folder.
The left area of the dialog with its button “Apply to Frames and Show” is used to protect the actually loaded show. The right area is used to protect all shows, which are stored in the selected folder (and its sub folders). Use the button “Apply to all Shows” to protect all shows in the folder (and subfolders). If the option “Delete unused files in Show folder” is activated, then all unused figures in the very folders are deleted. Enter Dongle number “0” to use this feature without the protection function.
It is strongly recommended to create a backup copy of the folder before protecting it – just to make sure nothing goes wrong.
The dongle numbers entered in the left area of the dialog box are used for both ways. This is how the permission settings work:
- Only the “Dongle-No. enabled to give rights” can change the rights.
- If all numbers are set to 0, no rights are set – the show is open for everybody’s use. No protection is applied!
- It is only possible to change the permission settings, if the actually inserted license equals the Dongle-No. enabled to give rights. Otherwise no changes to permissions are possible.
- Protection spans all figure-files and all show-files.
- Before setting any protection it is strongly recommended to make a copy of the show(s)!
9.2.10. List of Show Names and Play Lists (loaded at the last sessions)
The 10 last loaded show or play lists are displayed at the bottom of the menu File for quick access. A click on the name of a show or Play List directly opens it.